
Complete Guide to LED PCB Board Assembly Techniques will help you master the skills necessary for assembling LED printed circuit boards (PCBs) efficiently and effectively. The significance of LED PCB assembly cannot be overstated, especially in today’s electronics-driven world where reliable lighting solutions are in demand. This article aims to outline key steps, tools, and techniques essential for successful LED PCB board assembly while addressing common challenges and advancements in the field.
1. What Is LED PCB Board Assembly?
What exactly is LED PCB board assembly? It’s the process of assembling light-emitting diodes (LEDs) onto printed circuit boards (PCBs) to create efficient and reliable electronic devices. But here’s the kicker: this process encompasses several steps, including placing components, soldering, and testing, all of which are crucial for the performance of the final product.
Understanding the LED PCB assembly method is essential, especially since it leverages advanced technologies to provide high-quality solutions for lighting fixtures, automotive lighting, and display screens. The assembly process can vary in complexity based on the design requirements and the specific application of the PCB.
In an LED PCB assembly, each component – from the LEDs themselves to various passive and active components – plays a specific role that contributes to the overall functionality of the board. Proper assembly ensures that these components operate effectively, leading to longer lifespans and better energy efficiency. Typically, the assembly involves techniques such as soldering, which joins components mechanically and electrically to the PCB.
Ultimately, LED PCB board assembly sets the foundation for high-performance lighting solutions, and understanding each step is crucial for anyone involved in electronics manufacturing. Whether you’re a hobbyist or part of a larger manufacturing operation, mastering this process is key to creating effective LED products.
| Step in LED PCB Assembly | Description |
|---|---|
| Component Placement | Positioning individual components on the board |
| Soldering | Joining components using solder to ensure electrical connections |
| Testing | Ensuring that the assembly is functioning correctly |
2. Why Is LED PCB Board Assembly Important?
What’s the real story behind the significance of LED PCB assembly? The importance lies not only in the functionality it brings to the table but also in the economic and environmental impact that well-made LED assemblies can have. For starters, LED PCB assembly is integral to producing energy-efficient lighting solutions that contribute significantly to reducing energy consumption and greenhouse gas emissions.
The economic implications are substantial as well. Companies that specialize in manufacturing LED products benefit from lower operating costs due to the high efficiency and durability of LEDs. While the upfront costs may be higher compared to traditional light sources, the long-term savings on energy bills and replacement costs contribute to a positive return on investment.
Additionally, effective LED PCB assembly can enhance product performance and reliability. Quality assembly processes lead to fewer defects, resulting in lower warranty claims and increased customer satisfaction. In a marketplace increasingly driven by performance and reliability, companies must prioritize efficient, high-quality assembly processes to stay competitive.
Moreover, LED technology continues to evolve, with advancements in PCB materials and assembly techniques emerging regularly. Staying informed about these developments not only helps manufacturers utilize the best available technology but also ensures that they can meet future consumer demand effectively.
In summary, the importance of LED PCB assembly cannot be understated. It serves as a foundation for energy-efficient products, drives economic benefits, and supports advancements in technology, ensuring that companies remain competitive in a thriving marketplace.
| Importance Factor | Explanation |
|---|---|
| Energy Efficiency | Significant reduction in energy consumption |
| Economic Benefits | Long-term savings on operational costs |
| Product Reliability | Fewer defects lead to increased customer satisfaction |
3. What Tools and Equipment Are Needed for LED PCB Board Assembly?
What tools should you have on hand for effective LED PCB board assembly? Having the right equipment is a crucial aspect of conducting successful assembly operations. Let’s break down the essential tools and equipment that every PCB assembly line should include.
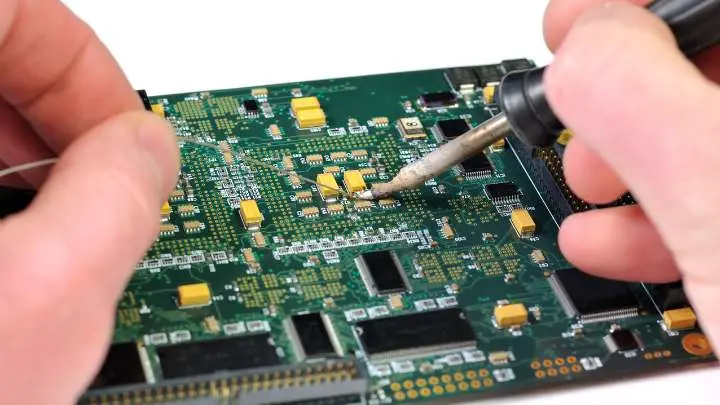
First, a high-quality soldering iron is a must-have. Different types of soldering irons are suited for various tasks. A temperature-controlled soldering iron is ideal for working with sensitive components like LEDs, allowing for precision without damaging the parts. But here’s the kicker: investing in a soldering station that includes a soldering iron, a stand, and a cleaning sponge can greatly enhance your workflow.
Next, consider investing in a pick-and-place machine, which automates the process of placing components on the PCB. These machines can significantly increase efficiency and accuracy, especially for larger production runs.
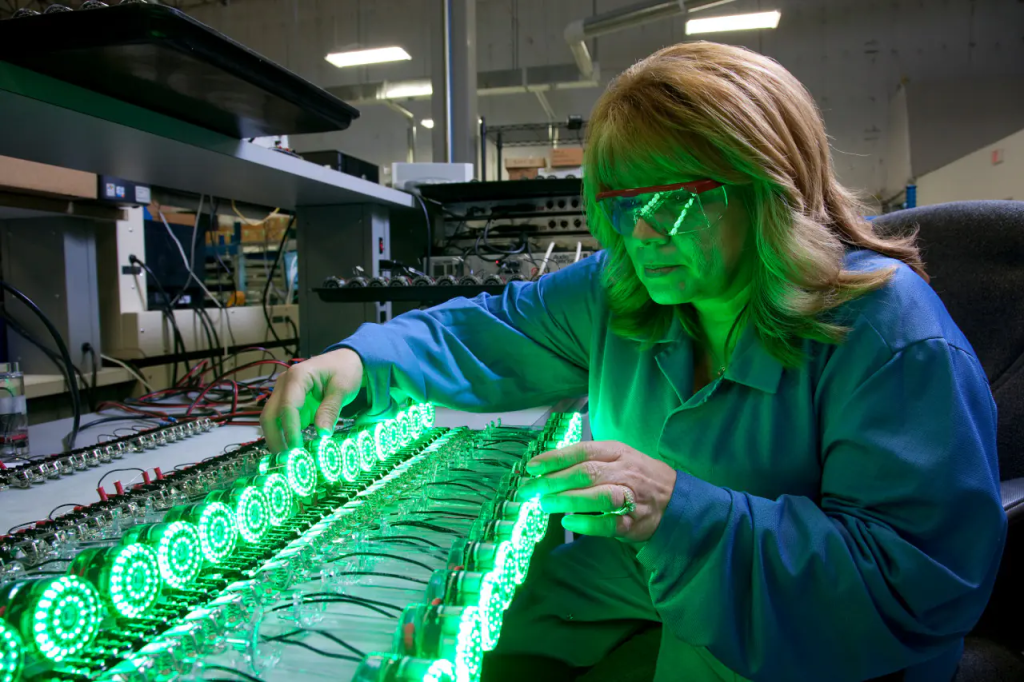
Safety equipment is equally important. Safety glasses protect your eyes from solder splashes, while anti-static wrist straps prevent damage from electrostatic discharge. It’s essential to work safely, especially in an environment where electrical components are being handled.
Additionally, other tools like wire cutters for trimming leads, tweezers for positioning small components, and multimeters for testing connections should be included in your assembly toolkit. Each piece of equipment plays a vital role in ensuring that the assembly process runs smoothly and efficiently.
Ultimately, the combination of high-quality tools and equipment creates a solid foundation for successful LED PCB board assembly, ensuring that each step of the process is carried out effectively.
| Tool or Equipment | Purpose |
|---|---|
| Soldering Iron | Essential for joining components |
| Pick-and-Place Machine | Automates component placement for accuracy |
| Safety Equipment | Protects workers from hazards associated with soldering |
4. What Materials Are Commonly Used in LED PCB Assembly?
What materials do you need for LED PCB assembly? Understanding the various materials that go into the assembly process is essential for achieving high-quality results. To start, a variety of printed circuit boards (PCBs) can be used in LED applications, including FR-4, aluminum, and flexible PCBs.
FR-4 is a popular choice for most LED PCB projects due to its good thermal and electrical insulating properties. Aluminum PCBs, however, are specifically designed for applications requiring excellent heat dissipation, making them ideal for high-power LED applications. Meanwhile, flexible PCBs allow for unique applications where circuit boards need to bend and conform to specific shapes.
Solder materials play a crucial role in the assembly process as well. Traditional tin-lead solder is still widely used; however, there is a growing trend towards lead-free soldering solutions, which align with environmental sustainability efforts. Lead-free solders require higher temperatures and different techniques, but they are becoming the standard in the industry.
Other components, such as resistors, capacitors, and diodes, are also integral to LED PCB assemblies. These passive components control voltage and current flow, enabling the LEDs to operate efficiently. Selection of the right materials is paramount for ensuring the assembly meets performance specifications and regulatory requirements.
In summary, understanding the various materials utilized in LED PCB assembly provides the groundwork necessary for creating efficient and reliable LED products, contributing to long-term success in the industry.
| Material Type | Description |
|---|---|
| FR-4 PCBs | Commonly used due to its thermal and electrical properties |
| Aluminum PCBs | Excellent heat dissipation for high-power applications |
| Lead-Free Solder | Eco-friendly solder with specific compositional features |
5. How Do You Prepare for LED PCB Board Assembly?
How do you set yourself up for success in LED PCB board assembly? Proper preparation is one of the most critical steps in achieving successful assembly outcomes. First, setting up a clean and organized workspace is essential. An uncluttered area allows for better focus and minimizes the chance of errors.
Next, safety precautions should always be a priority. Ensure that you have proper ventilation in your workspace, especially if you’re soldering. This will reduce exposure to harmful fumes. Wearing safety glasses and anti-static wrist straps will also protect you against potential hazards during the assembly process.
Understanding the components and the schematic is vital for effective preparation. Familiarize yourself with the LED layout and the functions of each component on the board. Having a clear view of how components interact not only helps in placing them correctly but also aids in troubleshooting any issues that may arise later.
Gathering all tools and materials needed before starting the assembly process can save time and prevent interruptions. Ensure that you have all components listed in the BOM (Bill of Materials) and check for any discrepancies. This thorough preparation will make the assembly process smoother and more efficient, leading to higher-quality results.
In summary, thorough preparation minimizes risks, enhances efficiency, and ultimately contributes to the quality of the final LED PCB assembly. The better prepared you are, the easier it will be to achieve the desired outcomes.
| Preparation Task | Purpose |
|---|---|
| Cleaning Workspace | Reduces potential errors and distractions |
| Safety Measures | Protects against hazards and ensures safe operation |
| Familiarizing with BOM | Ensures all components are in place before assembly |
6. What Are the Step-by-Step Procedures for Assembling LED PCBs?
What are the steps you need to follow for effective LED PCB assembly? Understanding the assembly process is crucial for achieving high-quality results. The steps typically include component placement, soldering, and inspection, each critical to ensuring a reliable assembly.
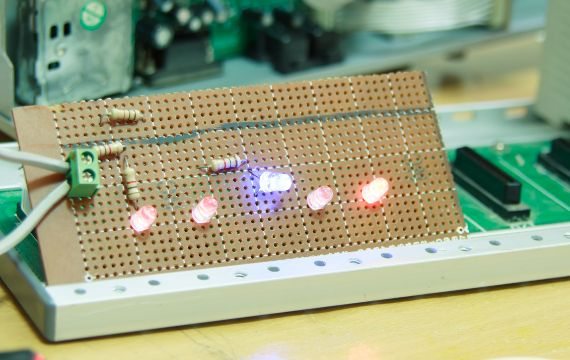
To start, gather your PCBs and components, ideally organized by type. You will begin by placing the components onto the PCB following the schematic layout provided in the BOM. This requires precision and attention to detail, especially for small components like SMD LEDs.
Once all components are placed correctly, it’s time for soldering. Ensure your soldering iron is at the appropriate temperature. For standard soldering, this typically falls around 350°C (662°F). Heat the joint where the component lead meets the PCB pad, and then feed in solder. It’s important to avoid overheating, as this can damage both the LED and the board.
After soldering, visually inspect each joint for quality. A good solder joint should be shiny and evenly globed without excess solder. You may also want to employ automated inspection methods if your production volume is high. Automated Optical Inspection (AOI) systems can detect defects quickly and accurately.
Finally, perform functional testing on the assembled PCBs to ensure everything works as expected. Power up the PCB and confirm that all LEDs illuminate correctly. Regularly rehearsing these procedures will lead to enhanced efficiency and quality in your LED PCB assemblies over time.
| Step | Description |
|---|---|
| Component Placement | Aligning components with the schematic layout |
| Soldering | Heating joints and adding solder for connection |
| Inspection | Checking each joint for quality and functionality |
7. How Do You Ensure Quality During the Assembly Process?
How can you bring quality assurance into the LED PCB assembly process? Ensuring that quality is maintained throughout assembly is vital for producing reliable products. Let’s delve into several best practices that can help in achieving high-quality assemblies.
First, implementing strict quality control measures at every stage of the assembly is crucial. This starts with inspecting incoming components against specifications to ensure they meet required standards before they are even placed on the board. A good practice is to have protocols in place for returning defective or non-compliant parts to suppliers.
During the actual assembly, operators should follow well-documented procedures. Creating standardized work instructions guarantees that all team members know the steps to follow, thus reducing the likelihood of errors. Training workers can also enhance their awareness of quality standards, giving them the knowledge to identify potential issues during assembly.
Another effective way to ensure quality is to establish a routine of inspection at multiple points during the assembly process. Visual inspections, functional tests, and later, Automated Optical Inspection (AOI) should be utilized to capture defects early. This not only prevents poor quality units from reaching the consumer but also reduces the cost of rework afterward.
Lastly, maintaining documentation of defects found and corrective actions taken provides invaluable data for continuous improvement. Regular reviewing of this data highlights trends that can inform better assembly practices in the future.
In summary, implementing robust quality assurance measures throughout the assembly process significantly improves product reliability and performance.
| Quality Assurance Measure | Purpose |
|---|---|
| Incoming Component Inspection | Filters out defective parts |
| Standardized Work Instructions | Guides operators to reduce errors |
| Routine Inspections | Captures defects early in the assembly process |
8. What Common Challenges Occur in LED PCB Assembly?
What are the common challenges faced during LED PCB assembly? While this process can be efficient, it’s not without its hurdles. Understanding these challenges helps in mitigating the risks associated with them.
One significant challenge is solder bridging, which occurs when solder inadvertently connects two or more component leads that shouldn’t be electrically connected. This often happens due to excess solder or insufficient clearance between leads. The consequences of solder bridging can be severe, leading to short circuits and failure of the final product.
Another hurdle is thermal management during soldering. LEDs are sensitive to heat; overheating can damage the chip, resulting in failures even after the assembly is complete. It’s essential to monitor soldering temperatures and apply effective thermal strategies to cool components properly.
Alignment issues can also arise during the assembly process, particularly with surface mount devices. Misalignment results in poor connectivity and may require rework that could have been avoided with proper techniques. Using automated pick-and-place systems can help reduce this risk significantly.
Lastly, ensuring proper solder joint formation is critical. Cold solder joints occur when the PCB or component leads aren’t heated sufficiently during the soldering process, leading to unreliable connections. Regular training and adherence to best practices can help mitigate these risks.
By recognizing these common challenges, assembly teams can develop strategies to address them proactively, ensuring a smoother assembly process and better overall product quality.
| Common Challenge | Description |
|---|---|
| Solder Bridging | Unwanted connection between leads causing shorts |
| Thermal Management | Overheating LEDs and damaging components |
| Alignment Issues | Misalignment during placement leading to defects |
9. How Can You Improve Efficiency in LED PCB Assembly?
How can you optimize efficiency in LED PCB assembly? Enhancing efficiency is key to maintaining competitiveness in the market and ensuring timely product delivery. Let’s explore a range of strategies that can contribute to improved assembly efficiency.
First and foremost, consider streamlining the workflow. Mapping out the entire assembly process can identify bottlenecks and redundancies within your operations. By eliminating these points of slowdown, you can enhance overall output. Implementing Lean manufacturing techniques can help in this respect.
Automating processes where feasible is another powerful way to boost efficiency. Utilizing pick-and-place machines can significantly increase speed and accuracy in component placement, minimizing errors associated with manual labor. Automation can also reduce labor costs over time.
Conducting regular training sessions with assembly staff improves their skills and knowledge, leading to more efficient handling of components and tools. Workers who are well-versed in best practices are more likely to identify issues early on and work more accurately.
Incorporating just-in-time inventory management can also optimize efficiency. By ensuring that only necessary components are available for assembly at any given time, companies can reduce overhead and streamline the assembly process, ensuring components are fresh and ready to use without excess storage costs.
In summary, improving efficiency in LED PCB assembly requires a combination of workflow optimization, automation, effective training, and smart inventory management.
| Efficiency Improvement Strategy | Benefit |
|---|---|
| Streamlining Workflow | Reduces bottlenecks in the assembly process |
| Automation | Increases speed and accuracy |
| Training Sessions | Enhances worker skills and knowledge |
10. What Testing Methods Are Essential for Assembled LED PCBs?
What testing methods should you prioritize for ensuring the quality of assembled LED PCBs? Testing is an integral component of the LED PCB assembly process, guaranteeing that the final product functions as intended.
Functional testing is one key method that checks whether the assembled PCB operates correctly under specified conditions. This often involves applying voltage and verifying that the LEDs light up as expected. Functional tests must be comprehensive, ensuring that all components on the board are working and interacting properly.
Thermal testing is also crucial, particularly in high-power LED applications where heat management can significantly impact performance. By measuring the temperature of the components under load conditions, manufacturers can identify potential thermal issues that may arise during operation. Ensuring optimal thermal dissipation is key to prolonging the lifespan of LEDs.
Continuity testing is another essential method. Using a multimeter, this testing method checks for proper electrical connections throughout the PCB. It helps detect short circuits, cold joints, or any other connectivity issues that could arise during assembly.
By employing these testing methods, manufacturers can ensure their assembled LED PCBs meet operational expectations and maintain high quality standards. Regularly integrating testing into the production cycle will also pave the way for continuous improvement practices.
| Testing Method | Purpose |
|---|---|
| Functional Testing | Confirms overall operational functionality |
| Thermal Testing | Assesses heat management and thermal stability |
| Continuity Testing | Verifies electrical connections for reliability |
11. What Maintenance Is Required for LED PCBs Post-Assembly?
What level of maintenance should be applied to LED PCBs after assembly? Post-assembly maintenance is crucial to maintaining performance and extending the lifespan of LED products. Regular inspections should be part of your ongoing maintenance routine. This includes checking for any signs of physical damage, discoloration, or wear.
Cleaning assembled LED PCBs is essential to prevent buildup of dust or contaminants which can impact their performance. Using appropriate cleaning agents that won’t damage the components, such as isopropyl alcohol, is advisable. Ensure you’re using clean, dry cloths or brushes to avoid leaving residues.
Monitoring for changes in performance is crucial. If any noticeable dips in brightness or functionality occur, these could signal underlying maintenance issues. Regular checks can uncover potential problems before they lead to significant failures.
Furthermore, keeping thorough documentation of maintenance activities can aid in tracking the performance and reliability of your LED assemblies over time. This data can be invaluable for identifying patterns that may indicate the need for design improvements or further quality assurance measures.
In summary, regular maintenance of LED PCBs post-assembly is essential for their longevity and effectiveness. Inspections, cleaning, monitoring performance, and documentation are key components of a successful maintenance program.
| Maintenance Activity | Importance |
|---|---|
| Regular Inspections | Detects signs of damage or wear |
| Cleaning | Prevents performance issues due to contaminants |
| Performance Monitoring | Identifies potential failures early |
12. How Does LED PCB Assembly Impact Final Product Performance?
How does the quality of LED PCB assembly directly affect the performance of the final product? The assembly process is critical because every mistake or oversight can lead to diminished function or even complete product failures.
One significant aspect is the electrical connections established during assembly. High-quality solder joints are essential for optimal conductivity, affecting brightness and energy efficiency. A weak connection can lead to flickering lights or, worse, total failure of the LED. Therefore, the importance of proper soldering techniques cannot be overlooked.
Thermal management is another critical factor. During assembly, proper attention must be paid to ensuring that components can dissipate heat effectively. Quality assembly can help prevent thermal issues, which are one of the leading causes of LED failure. Here’s where it gets interesting: well-assembled PCBs with adequate thermal dissipation tactics can enhance longevity and maintain performance over time.
Finally, the overall reliability of the product hinges on quality assembly practices. If an LED product is poorly assembled, it may not perform in accordance with industry standards, thereby affecting customer satisfaction and brand reputation.
In essence, effective LED PCB assembly has a direct correlation with the performance and reliability of the final products, which underlines the necessity for quality assurance in the manufacturing process.
| Impact Factor | Description |
|---|---|
| Electrical Connections | Influences brightness and energy efficiency |
| Thermal Management | Affects longevity and performance of LEDs |
| Overall Reliability | Determines customer satisfaction and brand trust |
13. What Are the Latest Trends in LED PCB Assembly?
What trends should you be aware of in LED PCB assembly? Keeping abreast of industry trends is essential for staying competitive and relevant in the fast-paced world of electronics manufacturing.
One prominent trend is towards sustainability. Manufacturers are increasingly utilizing eco-friendly materials and processes in PCB production, such as lead-free solder and recyclable components. This shift not only benefits the environment but also aligns with consumer preferences for greener products.
Automation continues to play a large role in enhancing assembly efficiency. From pick-and-place machines to automated testing procedures, technology is reducing human error and increasing output. Companies that adopt automation tools can realize significant productivity gains.
Additionally, advances in PCB design technologies are revolutionizing LED assembly. The ability to create more intricate, compact designs allows for greater flexibility, leading to innovative LED applications in various industries—from automotive to consumer electronics.
Finally, the trend of integrating smart technologies within LED products is becoming more prevalent. IoT-enabled devices are on the rise, allowing for remote control and monitoring of LED lighting systems. This integration opens doors for new functionalities and markets.
In summary, staying updated on trends in LED PCB assembly can provide companies with competitive advantages, streamline operations, and increase alignment with evolving consumer demands.
| Trend | Description |
|---|---|
| Sustainability | Use of eco-friendly materials and processes |
| Automation | Enhanced efficiency and reduced human error |
| Smart Technology | Integration of IoT for advanced functionalities |
14. How Can You Stay Updated on Best Practices in LED PCB Assembly?
How can professionals remain informed about best practices in LED PCB assembly? Staying updated is key to maintaining competitive advantage and high-quality standards. One of the best ways to do this is by subscribing to industry publications and journals that focus on LED technology and manufacturing processes.
Participating in webinars and online courses can provide essential updates on new techniques, tools, and materials. Many organizations offer courses that feature expert insights on emerging trends and best practices in the field.
Networking is also incredibly valuable. Joining professional organizations, such as the IPC (Association Connecting Electronics Industries), provides access to a community of colleagues who share insights and experiences.
Attending industry conferences and trade shows can expose professionals to the latest advances in technology as well as networking opportunities. These events showcase innovations that could enhance your PCB assembly processes and allow for discussions on evolving challenges.
In conclusion, staying informed about best practices in LED PCB assembly requires a commitment to continuous learning through various avenues, ensuring that you and your organization remain competitive and knowledgeable in the industry.
| Education Method | Benefits |
|---|---|
| Publications | Keep informed on industry advancements |
| Webinars | Enhance skills and knowledge from experts |
| Networking Events | Connect with fellow professionals for insights |
15. What Are the Future Developments in LED PCB Assembly Techniques?
What future developments should you anticipate in LED PCB assembly techniques? The landscape of electronics manufacturing is continuously evolving, and several advancements are on the horizon.
One significant area of development is the improvement in materials used for PCBs and components. Advances in nano-coatings and thermal materials promise to enhance the efficiency and longevity of LED assemblies, ultimately delivering better performance in dynamic environments.
Moreover, machine learning and artificial intelligence are beginning to influence how assembly processes are optimized. These technologies can analyze production data to identify efficiencies, enabling smarter decision-making regarding workflow and resource allocation.
Emer