
Create Your Own DIY LED Strip Lighting PCB is designed to guide you through the entire process of designing and assembling your customized PCB for LED strip lighting. In today’s world, where customizability and personalization are valued, understanding how to create your own LED lighting solutions can be an invaluable skill. This article aims to equip you with the knowledge to design, manufacture, and implement your own LED strip lighting while covering all the necessary components, tools, and techniques required for success.
1. What Is DIY LED Strip Lighting?
What exactly is DIY LED strip lighting? At its core, DIY LED strip lighting refers to the hands-on approach of designing, assembling, and installing LED strips tailored to fit specific lighting needs. This hands-on project has gained considerable traction among hobbyists and professionals alike, thanks to the versatility and efficiency of LED technology.
What’s the real story behind its popularity? For starters, DIY LED strip lighting allows users to create unique and personalized setups that cater to their specific aesthetics and functional requirements. Users can choose everything from the type of LED, to the color temperature, brightness, and length of the strip, thereby mastering their lighting environments.
The benefits of LED technology are numerous. LEDs consume significantly less power compared to traditional incandescent or fluorescent bulbs, making them more energy-efficient. They also have a longer lifespan, which translates to fewer replacements and lower overall costs in the long run. With advancements in technology, DIY LED strips can also incorporate features like RGB color-changing capabilities, dimming, and smart controls, allowing users to enhance creativity in lighting designs.
DIY LED strip lighting fosters innovation and creativity by empowering individuals to design their projects. The freedom to choose each aspect, from the PCB layout to the type of LEDs used, can spark inspiration and lead to exceptional lighting solutions tailored for a wide array of applications, whether residential, commercial, or artistic.
| Characteristics | Benefits |
|---|---|
| Customizability | Tailored to individual needs and project specifications |
| Energy Efficiency | Consumes less power, leading to reduced costs |
| Longevity | Longer lifespan than traditional lighting options |
2. Why Design Your Own Custom PCB for LED Strips?
Why should you consider designing your own custom PCB for LED strips? The answer lies in the multitude of benefits that come from creating a solution tailored to your specific needs. But here’s the kicker: a custom PCB is not just about aesthetics; it is about functionality, cost-effectiveness, and advanced capabilities.
One of the biggest advantages of designing your own custom PCB is flexibility. With a custom PCB, you can design circuit paths that fit perfectly into your chosen environment, optimizing for space or aesthetic considerations. For instance, if you’re designing an LED strip to fit into a certain piece of furniture or for a specific installation site, a custom PCB allows you to maximize the effective use of space without any leftover material.
Cost-effectiveness is another significant factor. While pre-made LED strip solutions might seem convenient, they often come at a premium. By designing your PCB, you can cut down on unnecessary costs associated with retailers or manufacturers marking up prices. Additionally, custom designs allow for the use of components that align closely with your budget, potentially selecting lower-cost alternatives that still meet your project requirements.
Importantly, a custom PCB design can provide enhanced functionality. Users can integrate features like dimming capabilities, programmable patterns, or even sensors for motion detection within the PCB design. This increased functionality not only opens doors to innovative designs but also allows you to create advanced applications, like ambient lighting that reacts to the environment.
In essence, creating a custom PCB empowers you to optimize, personalize, and innovate with your DIY LED strip projects beyond what is possible with standard pre-made options.
| Benefits | Description |
|---|---|
| Flexibility | Tailored designs for specific environments |
| Cost-Effectiveness | Reduces additional markups from vendors |
| Enhanced Functionality | Integration of sensors and programmable features |
3. What Do You Need to Get Started with DIY LED Strip Lighting?
What do you need to get started with DIY LED strip lighting? This is a crucial question for anyone looking to embark on their journey of custom PCB design and LED assembly. Ready for the good part? Knowing the right tools and materials will set you on a path to success in your project.
First, consider the essential tools required for PCB design and assembly. The most important tool is PCB design software, which allows you to create your schematic and layout. Popular options include EasyEDA, KiCAD, and Eagle. Each of these platforms offers user-friendly interfaces that cater to beginners while providing advanced features for seasoned professionals.
Next on your list of essentials should be soldering equipment. A quality soldering iron, along with solder wire and a desoldering pump, is crucial for assembling your PCB. Soldering involves joining electronic components to the PCB and requires practice to master. Additionally, tweezers and a multimeter are necessary for handling small components and ensuring that electrical connections are established properly.
Now, let’s talk about materials. The LED strip segments themselves should be selected based on your requirements. Consider the type, color temperature, and power rating of the LEDs you plan to use. Furthermore, you will need components such as resistors, capacitors, and possibly transistors to enhance or modify circuit functionality.
Lastly, if you are new to the PCB world, consider investing in a prototyping board for initial experiments and tests. This allows you to play around with different configurations without the need to commit to a permanent PCB layout right away.
By gathering the right tools and materials, you pave the way for a successful DIY LED strip lighting project, allowing your creativity to shine through.
| Tools Needed | Description |
|---|---|
| PCB Design Software | Critical for creating schematic and layouts |
| Soldering Equipment | Essential for assembling your PCB |
| Testing Tools | Multimeter for checking connections |
4. How Do You Choose the Right LED Chips for Your Project?
How do you choose the right LED chips for your project? Selecting the appropriate LED chips is critical for the success of your DIY LED strip lighting as they directly influence the performance, longevity, and overall aesthetic. What’s the real story behind different types? Here, we’ll explore factors to consider when making your selection.
First, consider the type of LED. Common types include SMD (Surface-Mount Device) LEDs and COB (Chip-On-Board) LEDs. SMD LEDs are compact and efficient, making them popular for various lighting solutions, while COB LEDs provide a smooth, continuous appearance and are typically used in applications requiring bright, uniform illumination.
Next, evaluate the color temperature. LED chips come in a range of color temperatures, measured in Kelvin (K). For example, a lower color temperature (around 2700K-3000K) produces a warm light, great for creating cozy atmospheres, while a higher temperature (4000K-6500K) yields a cool, daylight-like appearance, which is ideal for workspaces. This selection should align with the intended use of your lighting setup.
Equally important is the lumen output and power rating. Lumens measure the total amount of visible light emitted by a source, so choosing chips with the right lumen output ensures your DIY strip produces sufficient brightness for your specific application. Meanwhile, understanding the power rating ensures safety and reliability, indicating how much energy the chip consumes. A balance of these factors works together to determine both visual impact and energy efficiency.
Lastly, consider brand reputation and quality. Not all LEDs are created equal, and purchasing from reliable manufacturers can make a significant difference in performance and durability. Reading reviews and asking for recommendations can guide you to the best choices in the market.
With these considerations in mind, you can select the right LED chips that not only meet your technical needs but also enhance the visual appeal of your projects.
| Selection Criteria | Key Considerations |
|---|---|
| Type of LED | Choosing between SMD and COB options |
| Color Temperature | Aligning with the ambiance or function needed |
| Lumen Output | Ensuring appropriate brightness for the application |
5. What Are the Key Steps in Designing a Custom PCB?
What are the key steps in designing a custom PCB? Understanding the workflow of PCB design is crucial, as it is a complex process that lays the foundation for the functionality of your DIY LED strip lighting. This is where it gets interesting—designing a PCB involves creativity, precision, and a good understanding of electrical engineering principles.
The first step involves creating a schematic diagram, which serves as a blueprint for your PCB. This diagram visually represents how components will be connected. Using PCB design software, you can drag and drop components into the design area, ensuring that all necessary parts are represented. Properly labeling and organizing components from the beginning can ease the later stages of the design.
Once your schematic is complete, the next step is to layout your PCB. During this process, you arrange components and route connections using traces on the board. Take care to minimize the length of connections where possible, as shorter traces can lead to reduced resistance and improved performance. Additionally, consider the physical dimensions and placement of your components, ensuring that there is enough space to solder and assemble them optimally.
After the layout is finished, it’s time for a thorough review. Double-check your connections to ensure accuracy, as mistakes can lead to troubles in functionality. Use the design rule checking tools in your software to automatically validate your layout against common issues, such as overlapping traces or incorrect component placements.
Finally, once everything is validated, export the design files for manufacturing. Depending on preferences, these files can be sent directly to a PCB manufacturer or printed using DIY methods if you’re feeling adventurous.
By following these steps meticulously, you ensure that your custom PCB is well-designed and ready for the next phase of your DIY LED strip project.
| Design Steps | Description |
|---|---|
| Schematic Creation | Blueprint of how components connect |
| PCB Layout Design | Arranging and routing connections on the board |
| Review and Validation | Checking for errors before manufacturing |
6. How Do You Prepare and Print Your PCB Design?
How do you prepare and print your PCB design? After finalizing your design, the next crucial step is translating that design into a physical board. But here’s the kicker: choosing the right printing method can greatly affect the quality and performance of your PCB.
To start, once your design files are ready, the first decision is whether to use a PCB fabrication service or DIY methods. Professional fabrication services can produce high-quality boards efficiently but will involve costs and time for shipping. On the other hand, DIY methods, while cost-effective, require knowledge of various printing techniques, such as toner transfer or photo-etching.
If you choose a fabrication service, ensure your design files are in the required format (often Gerber files). Carefully review the manufacturer’s specifications, including PCB thickness, copper weight, and surface finish options. The latter can vary widely, affecting solderability and durability. Checking these specifications against your project’s needs is essential.
If opting for DIY printing, a toner transfer method is a popular choice for hobbyists. This requires printing your PCB design onto glossy paper using a laser printer and then transferring the toner onto a copper-clad board using a heat source. Another option is to use a UV exposure method, where a photosensitive board is developed using UV light. Each of these methods has its pros and cons, affecting the skill level required and the final quality of the board.
After production, cleaning the PCB surfaces and preparing it for assembly is crucial. Remove any residues from manufacturing processes, checking for shorts or defects that could impair performance.
In summary, preparing and printing your PCB design is an important process that can mean the difference between success and failure in your DIY LED project. Assess your options carefully to make informed decisions.
| Preparation Methods | Description |
|---|---|
| Professional Fabrication | Fast, high-quality results, higher cost |
| DIY Methods | Toner transfer and photo-etching techniques |
| Post-Production Cleaning | Essential for ensuring optimal performance |
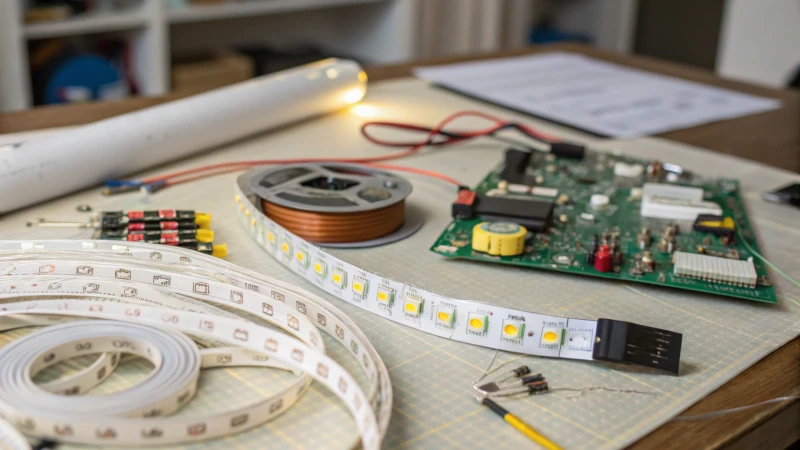
7. What Components Do You Need to Assemble Your DIY PCB?
What components do you need to assemble your DIY PCB? Selecting the right components is essential for the successful outcome of your custom LED strip lighting project. But here’s the kicker: the quality and specifications of your components can significantly impact performance and longevity.
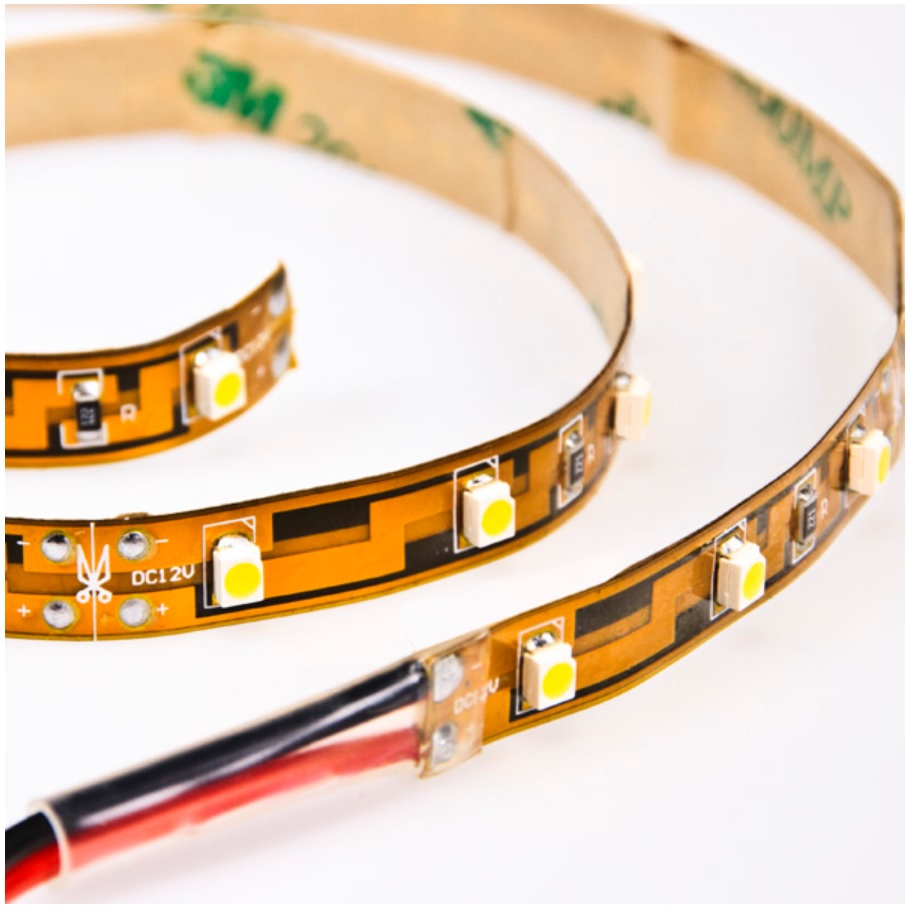
Fundamentally, you’ll require various electronic components to complete your PCB assembly. All LED strip projects start with LED chips, which are the heart of your lighting system. Whether opting for SMD or COB LEDs, ensure they are compatible with your project’s power and brightness requirements.
Next, resistors are vital in managing the current flow to the LEDs. Choosing the correct resistor values can prevent damage from excess current and ensure optimal brightness. A multimeter and ohm’s law can assist in calculating the proper resistance needed based on your LED specifications.
Capacitors may also be necessary, particularly when working with power supply circuits. They help stabilize voltage, filtering out fluctuations that can affect performance. Depending on your design, you might consider decoupling capacitors placed near the power pins of your LEDs.
Transistors can be beneficial for switching applications, enabling control over LED power and functionality, especially if you plan to integrate dimming or smart features. Additionally, you may want standoffs or connectors to establish secure connections for power supply and signal transmission.
When sourcing your components, purchase from reputable suppliers or manufacturers to ensure quality and reliability. Subpar components can lead to failures, compromising your entire project, and can result in safety hazards.
Being thorough in component selection will position you well for success in your DIY LED project, ensuring performance and durability.
| Required Components | Purpose |
|---|---|
| LED Chips | Source of light for your project |
| Resistors | Control current flow to prevent damage |
| Capacitors | Stabilize voltage and reduce fluctuations |
8. How Do You Solder Components to Your PCB?
How do you solder components to your PCB? Soldering is a critical step that requires meticulous attention and skill. This is where it gets interesting: mastering soldering techniques can often make the difference between a successful assembly and a frustrating project filled with errors.
Before you begin, gather all necessary equipment, including a soldering iron, solder wire, tweezers, and safety glasses. A good quality soldering iron with a fine tip will help you work on small components effectively, allowing for precise application. Prepare your workspace by ensuring it’s clean and well-lit, preventing accidents and mistakes during the soldering process.
Start by positioning your components on the PCB, ensuring they align correctly with the designated pads. Use tweezers to hold smaller components in place while you solder. For beginners, it is often advisable to start with larger components before moving to more intricate ones. Each lead should make contact with the PCB pad without excessive force.
Now, heat the connection. Touch the soldering iron tip against the lead of the component and the pad simultaneously. Once heated, introduce the solder wire to the joint until it flows around and adheres to both the lead and pad. Remove the solder wire first, then the iron, and allow the joint to cool. Inspect each connection visually to ensure it is clean and shiny; a dull joint indicates a cold solder, which can cause connectivity issues.
For thoroughness, it’s crucial to verify connections with a multimeter after soldering. Testing continuity will highlight any cold solder joints or shorts, enabling you to troubleshoot before moving forward.
With practice, soldering becomes easier, leading to a more professional finish on your DIY PCB assembly and ensuring the reliability of your LED strip lighting.
| Soldering Steps | Description |
|---|---|
| Preparation | Gather tools and clean workspace |
| Position Components | Align and hold components for soldering |
| Heat and Apply Solder | Ensure proper techniques for strong joints |
9. What Are the Testing Procedures for Your Custom PCB?
What are the testing procedures for your custom PCB? Testing is a pivotal phase in ensuring that your DIY LED strip lighting functions correctly and safely. Ready for the good part? Understanding and conducting thorough testing can save you from future headaches and ensure a successful project.
Start your testing with visual inspection. Examine the PCB for any visible flaws, such as cold solder joints, misplaced components, or shorts between traces. This initial check often reveals issues that can be corrected before further testing commences.
Next, utilize a multimeter to check for continuity across your connections and to ensure that power flows where it is supposed to. Testing the resistance of resistors and verifying that there are no shorts between power and ground pins is crucial for preventing potential failures. If you detect any shorts or unexpected resistance, you may need to refocus your effort on correcting these issues.
Once the initial checks are complete, it’s time for functional tests. Power up the circuit and observe the behavior of the LEDs. Verify that they illuminate as expected and that any features you integrated, such as dimming controls or sensors, perform correctly. If the results aren’t as intended, consider reviewing your design and connections to locate potential errors.
Finally, consider long-duration tests. Running your LED strip for an extended period will help identify thermal issues or components that might fail over time. Utilize a thermal camera or infrared thermometer to assess temperatures across your PCB, ensuring that critical components remain within acceptable limits.
By incorporating thorough testing procedures, you help guarantee that your DIY LED projects not only work as intended but will perform reliably in the long term.
| Testing Procedures | Purpose |
|---|---|
| Visual Inspection | Initial check for apparent flaws |
| Continuity Testing | Ensures correct connections and functionality |
| Functional Testing | Validates that the PCB operates as designed |
10. How Do You Install and Power Your DIY LED Strip Lighting?
How do you install and power your DIY LED strip lighting? This is a significant step that requires careful consideration to ensure both aesthetics and functionality align perfectly. But here’s the kicker: proper installation ensures that your hard work pays off with impressive results.
Begin by determining the layout and design where you want to place your LED strip. Mark your installation area to visualize the best placement. It’s essential to ensure that the surface is clean, smooth, and ready for attachment. For vertical surfaces, consider using adhesive backing to secure your LED strips, while horizontal placements may allow for more varied mounting options.
When it comes to powering your LED strips, select an appropriate power supply. Confirm that the voltage and current ratings match those specified for your LEDs to ensure safe and effective operation. For typical LED strips, a 12V or 24V power supply is common—but always consult your component specifications.
Connect the LED strips to the power supply by using soldered connections or connectors. Ensure secure attachments to prevent disconnections during operation. If using connectors, double-check their compatibility to eliminate wiring errors.
After mounting and connecting your LEDs, it’s crucial to test. Power on your setup to ensure that the strips illuminate properly. Pay attention to potential flickering or dim lighting, which may indicate an inadequate power supply or connection issues.
Finally, consider incorporating dimmers or smart controls to allow for user-driven adjustments in brightness, enhancing the versatility of your lighting setup.
By mastering these installation and power supply principles, you can achieve a beautifully integrated DIY LED strip lighting solution that exceeds expectations.
| Installation Considerations | Description |
|---|---|
| Layout Planning | Visualize the intended lighting placement |
| Power Supply Selection | Choose a supply compatible with your LEDs |
| Connection Methods | Secure connections for reliable performance |
11. What Are the Best Practices for Creating Durable LED Strip Lighting?
What are the best practices for creating durable LED strip lighting? Ensuring the longevity of your lighting project is essential, especially if you aim to create a permanent installation. This is where it gets interesting: employing best practices can significantly amplify the durability and functionality of your DIY LED setup.
Firstly, choosing high-quality components during your design and assembly stages cannot be overstated. Investing in durable materials, reputable LED chips, and quality PCBs can save you time and money in the long run, minimizing the need for replacements. A well-manufactured PCB contributes significantly to overall circuit reliability by mitigating factors that often lead to failure.
Proper thermal management is another crucial consideration. LEDs generate heat during operation, and excessive heat can compromise performance and decrease lifespan. Effective thermal dissipation strategies include using heat sinks, thermal pads, or even cooling fans in high-power applications. Ensuring a suitable design that allows heat to escape will enhance both performance and longevity for your lighting setup.
Protection against environmental factors also plays a key role. If your LED strips are intended for outdoor use, choosing waterproof or sealed options can safeguard against moisture, UV damage, and temperature extremes. Products with IP ratings indicate their ability to resist dust and water, thus enhancing their durability in challenging environments.
Finally, regular maintenance is essential to keep your LED strip lighting in top condition. Periodically check for any signs of wear or malfunction, such as flickering lights or heat issues. Acting proactively to replace damaged components or clean connections will extend the life of your project and ensure reliable performance.
Incorporating these best practices into your process not only enhances durability but also fosters user satisfaction through consistent and durable performance.
| Best Practices | Description |
|---|---|
| Quality Component Selection | Invest in durable materials and reputable brands |
| Thermal Management | Use heat sinks or cooling solutions |
| Environmental Protection | Choose products rated for outdoor use |
12. How Can You Enhance Your DIY LED Strip Lighting with Smart Features?
How can you enhance your DIY LED strip lighting with smart features? In this technology-driven era, integrating smart controls into your lighting projects can revolutionize the user experience. What’s the real story? Smart features not only provide convenience but also add versatility to your designs.
One of the most impactful enhancements involves using Wi-Fi or Bluetooth modules to create a smart lighting system. These modules allow users to control their LED strips via smartphones or smart home devices, enabling features like remote operation and scheduled automation. Incorporating platforms such as Arduino or Raspberry Pi can provide a foundation for building advanced control systems that respond to user-input or external sensors.
Additionally, consider integrating sensors for motion detection or ambient light levels. By using these sensors, you can create dynamic lighting solutions that adapt to your environment. For instance, LED strips can automatically dim during daylight or activate when someone enters the room, promoting energy efficiency and prolonging LED life.
Color-changing features, driven by RGB LEDs, can also transform a simple setup into a vibrant display. Incorporating a controller allows users to select colors based on preference or mood, enabling personalization. Controllers can even facilitate fading effects or patterns that elevate the lighting ambiance, particularly in entertainment or hospitality settings.
Finally, compatibility with home automation systems can further enhance interoperability, allowing your DIY LED lights to interact seamlessly with other smart devices. For example, programming lights to respond to voice commands via smart assistants such as Google Assistant or Amazon Alexa adds a whole new layer of convenience and innovation to your lighting project.
By exploring the integration of smart features, you can elevate your DIY LED strip lighting, offering an engaging, user-friendly experience that meets modern consumer expectations.
| Smart Features | Benefits |
|---|---|
| Wi-Fi/Bluetooth Integration | Remote control and automation capabilities |
| Sensors | Dynamic lighting adjustments based on environment |
| RGB Color Control | Enhanced personalization and atmosphere |
13. What Common Problems Might You Encounter with DIY LED Strips?
What common problems might you encounter with DIY LED strips? Understanding potential pitfalls ahead of time can prepare you for successful projects and minimize frustration during assembly or installation. This is where it gets interesting—recognizing common issues enables better troubleshooting and solutions.
One prevalent issue is soldering problems, which can manifest as cold solder joints, bridges, or incorrect component placements. Cold solder joints often result from insufficient heating of the connection, leading to unreliable electrical contact. Checking your soldering technique and ensuring proper temperatures can help mitigate this issue.
Another common challenge is detecting shorts in your circuit. A short circuit occurs when two traces accidentally connect, bypassing the intended components. This can burn out your LEDs, halt function, or create erratic behavior. Using a multimeter to perform continuity checks after assembly can prevent this issue before powering the board.
Power supply complications can also arise. If your LED strips flicker or fail to light after installation, it may stem from using an inappropriate power source. Checking voltage and current ratings against your LED specifications is critical for compliance. If discrepancies occur, upgrading to a compatible power supply is a necessary step.
Thermal management can factor into DIY projects as well. Running your LED strips at high brightness for extended periods without adequate cooling can lead the components to overheat, risking damage. Monitoring temperatures and implementing heat management strategies ensures consistent functionality.
By anticipating these challenges, you empower yourself to address issues proactively, paving the way for a smoother experience in creating DIY LED projects.
| Common Issues | Solutions |
|---|---|
| Soldering Problems | Ensure proper technique and temperature |
| Short Circuits | Use multimeter checks to identify issues |
| Power Supply Issues | Match supply ratings with LED specifications |
| Thermal Management | Implement cooling solutions where necessary |
14. How Can You Customize the Aesthetics of Your LED Strip Lighting?
How can you customize the aesthetics of your LED strip lighting? Crafting visually appealing setups not only enhances ambiance but also allows you to showcase your creativity. What’s the real story here? Customizing the appearance of your LED installations is a fun and satisfying aspect of the design process.
One of the simplest ways to enhance aesthetics is through color selection. By opting for RGB LED strips, you can achieve a broad spectrum of colors, effectively transforming the mood of the room. Using a controller, you can transition between colors to create dynamic light displays tailored to different occasions—everything from calming blues for relaxation to vibrant reds for parties.
Incorporating diffusers is another effective means to soften and distribute light evenly. Diffusers help eliminate harsh spots and produce a more uniform glow. Materials like frosted acrylic or thin fabric can be employed to create unique effects, enhancing visibility and spectrums while providing a polished finish to your setup.
Utilizing custom profiles or channels can also create creative lighting setups. By designing bespoke enclosures or mounts, you can highlight your LED strips while adding sections that neatly organize and conceal wiring. Additionally, illuminating architectural features like coves or under cabinet areas can produce subtle yet alluring enhancements.
Finally, integrating smart controls provides opportunities for aesthetic customization. Many smart lighting systems allow users to automate lighting patterns or network multiple setups. Such features enhance the overall experience while transforming ordinary spaces into stunning visual landscapes.
By tapping into these avenues for aesthetic customization, you can elevate your DIY LED strip lighting projects into extraordinary visual statements that resonate with individual style and tastes.
| Customization Options | Description |
|---|---|
| Color Selection | Utilizing RGB strips for versatile moods |
| Diffusers | Softening light and enhancing glare |
| Custom Profiles | Bespoke fixtures to highlight lighting |
15. Where Can You Find Additional Resources for DIY LED Projects?
Where can you find additional resources for DIY LED projects? As you explore the world of custom PCB design and LED strip lighting, having the right resources can provide invaluable support. But here’s the kicker: leveraging these resources can enhance your learning experience and elevate your projects.
Start by tapping into online communities and forums, such as Reddit’s r/LEDs or specific electronics forums. These platforms can connect you with enthusiasts who share their experiences, troubleshooting tips, and advice on projects. Engaging with these communities fosters collaboration and sparks inspiration.
YouTube is another powerful resource filled with practical tutorials, demonstrations, and project showcases. Many creators publish step-by-step guides that walk you through PCB design and assembly processes, soldering techniques, and creative LED applications. This visual format can greatly enhance comprehension, particularly for those who prefer hands-on learning.
Books and eBooks dedicated to DIY electronics and LED projects are also invaluable. Many authors provide comprehensive guides covering topics from basic PCB design principles to advanced programming techniques for smart lighting. Libraries or platforms like Amazon offer a vast selection of resources that address various aspects of working with LEDs.
Lastly, consider attending workshops or maker fairs, where you can learn from skilled professionals and connect with others in the field. Such events often feature live demonstrations, showcasing innovative techniques and the latest products available on the market. By immersing yourself in this environment, you can gather practical knowledge while networking with fellow enthusiasts.
By utilizing these resources effectively, you empower yourself to enhance your proficiency and creativity in DIY LED projects, ultimately enriching your personal and professional capabilities.
| Resource Type | Description |
|---|---|
| Online Communities | Forums for advice and project collaboration |
| YouTube Tutorials | Visual guides for hands-on learning |
| Books and eBooks | Comprehensive guides for various skill levels |
| Workshops and Maker Fairs | Networking opportunities and live demonstrations |
FAQ Section
Q1: What is DIY LED strip lighting?
DIY LED strip lighting involves creating customized LED light solutions that cater to specific needs, allowing users to personalize aspects like color, length, and functionality.
Q2: How does a custom PCB enhance DIY LED projects?
A custom PCB allows for tailored designs that match specific project requirements while often being more cost-effective than pre-made solutions.
Q3: What tools do I need to design my own PCB?
Essential tools include PCB design software, soldering equipment, electronic components, and testing tools such as a multimeter.
Q4: How do I test my DIY LED strip lighting after assembly?
Testing involves visual inspections, continuity checks with a multimeter, and functional tests to ensure proper operation of the LEDs and features.
Q5: What are some common problems with DIY LED strips?
Common issues include soldering mistakes, shorts in circuits, incorrect power supply specifications, and thermal management challenges.