
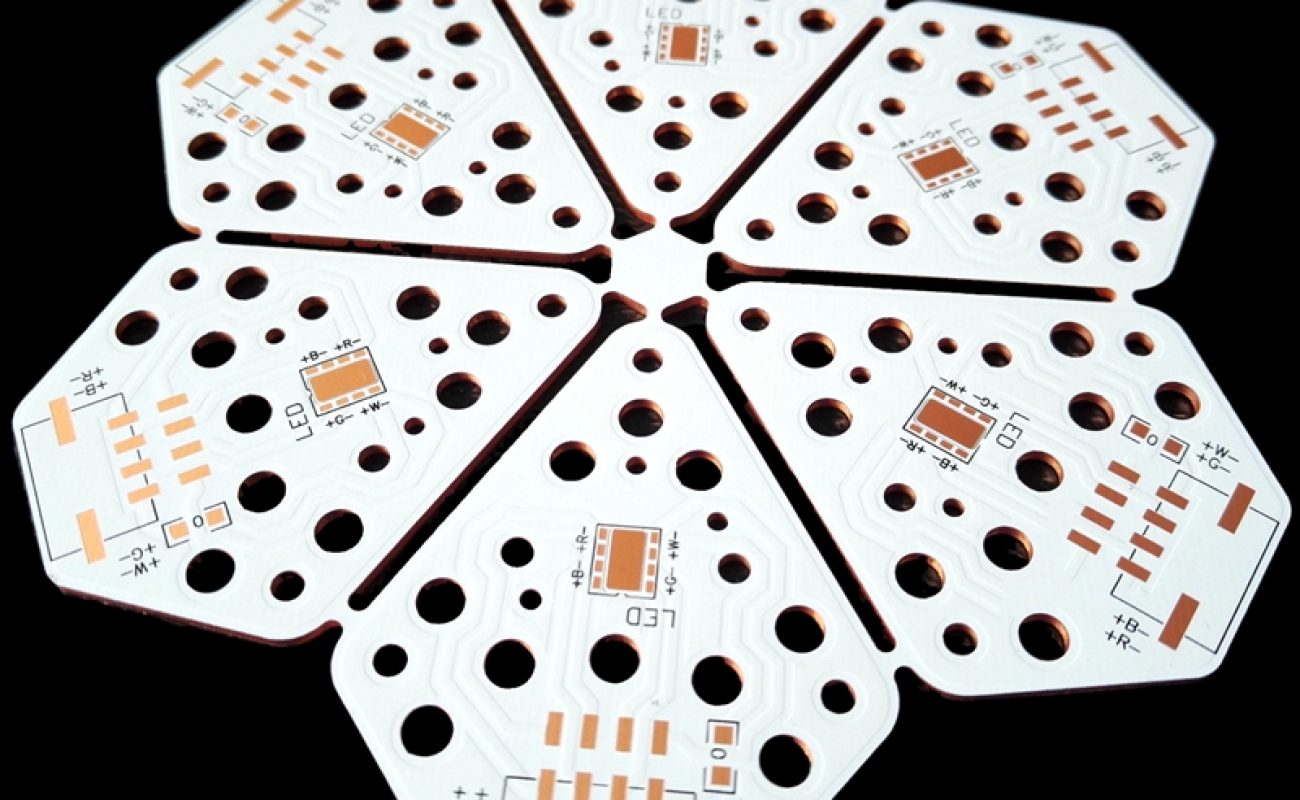
In the world of electronics, the process of creating an LED light PCB is crucial and fascinating. This article aims to provide a thorough understanding of how to create an LED light PCB, addressing key elements from materials and design to assembly and testing. By the end, you will not only grasp the technical aspects but also have actionable insights into the process.

1. What is an LED Light PCB?
An LED light PCB is a specialized printed circuit board designed to support LED components in electronic devices. But here’s the kicker: it plays a vital role in ensuring that these lights function optimally and efficiently. The LED PCB comprises several layers, typically featuring conductive traces and pads that secure LEDs and facilitate electrical connections.
Understanding the significance of an LED light PCB goes beyond its function. The basic components include the substrate, copper layer, solder mask, and silkscreen. The substrate is usually made of materials like FR-4 or aluminum, which provide thermal conductivity—crucial for heat dissipation in high-power LED applications. Meanwhile, the copper layer carries the current, while the solder mask protects the copper traces from oxidation and short circuits.
This is where it gets interesting: LED light PCBs can come in various forms, from rigid to flexible designs, depending on the application. Rigid PCBs are commonly used in fixed installations, while flexible PCBs offer unique advantages for custom shapes and tight spaces. This adaptability widens the potential applications of LED PCBs, making them invaluable across various industries, including automotive, commercial lighting, and consumer electronics.
| Feature | Rigid LED PCB | Flexible LED PCB |
|---|---|---|
| Application | Fixed installations | Custom shapes |
| Material | FR-4 or aluminum | Polyimide films |
| Cost | Generally lower | Higher due to complexity |
2. Why is a PCB Important for LED Lights?
The importance of a PCB in LED lights cannot be overstated. What’s the real story behind it? A PCB serves as both a structural base and a conduit for electricity, making it essential for the operation of LED lights. Unlike traditional bulbs, LEDs require precise electrical specifications for optimal performance, and PCBs help maintain these specifications.
One of the most significant advantages of PCBs for LED applications is their ability to distribute heat effectively. LEDs generate heat during operation, and an improper thermal management system can lead to reduced longevity or failure. PCBs can incorporate thermal vias and heat sinks, ensuring heat dissipates correctly, thus extending the life of LED components.
Moreover, using PCBs allows for more compact designs. By integrating numerous LEDs into a single board, manufacturers can create slimmer light fixtures. This is particularly beneficial in areas like interior design, where aesthetics and space are of paramount importance.
The versatility of LED PCBs is yet another factor contributing to their importance. They can be designed specifically for various applications such as puck lights, strip lights, and more, catering to consumer preferences and technological advancements. If you’re considering integrating LED lights into your products, knowing the significance of PCBs will help you make informed design decisions.
| Advantages of LED PCBs | Description |
|---|---|
| Efficient Heat Distribution | Prevents overheating of LEDs |
| Compact Designs | Allows for slimmer and space-efficient lighting |
| Versatility in Applications | Suitable for various types of LED lighting |
3. What Materials are Used for LED Light PCBs?
The choice of materials for LED light PCBs is pivotal for functionality and performance. Ready for the good part? The most common materials include FR-4, aluminum, and, in some cases, ceramic. Each material has its unique set of properties that can influence the performance of the LED assembly.
FR-4 is the most widely used material due to its balance of cost-efficiency and performance. This fiberglass-reinforced epoxy laminate provides good electrical insulation and strength, making it suitable for most applications. However, in high-power LED scenarios, aluminum boards are preferred. They offer excellent thermal conductivity, which helps in effective heat dissipation. This is crucial for maintaining LED performance and longevity because excess heat can lead to decreased efficiency and a shorter lifespan.
Ceramic materials, while more expensive, are also used in specific applications where durability and thermal performance are essential. These are often found in high-end lighting solutions requiring optimal performance and reliability.
Furthermore, the selection of materials must consider environmental factors. For instance, IPC standards often dictate the choice of materials in industries aimed at reducing environmental impact. Green materials that conform to RoHS regulations are becoming increasingly prevalent in PCB manufacturing processes.
| Material Type | Description | Applications |
|---|---|---|
| FR-4 | Cost-effective, good performance, widely used | General LED applications |
| Aluminum | Excellent thermal conductivity, durable | High-power LED lighting |
| Ceramic | High performance and extreme durability | High-end specialized applications |
4. How to Design an LED Light PCB?
Designing an LED light PCB is both an art and a science. This is where it gets interesting: several critical principles guide the design process to ensure functionality and efficiency. The first step is understanding your power requirements. Different LEDs require different voltage and current levels, so it’s essential to factor these into your design from the outset.
Next, you’ll want to select appropriate software tools that can assist in PCB design. Tools such as Eagle, Altium Designer, and KiCAD are popular choices. They provide built-in libraries of components and design rules to streamline the process. But the design isn’t just about laying out components; it’s also about ensuring the traces connecting them can handle the electrical load.
One critical aspect of PCB design is the layout. Keep in mind that the placement of components affects not only the performance but also the ease of manufacture. Arrange the LEDs to minimize the distance between connections and reduce signal loss. Optimizing trace width is another vital factor; wider traces can accommodate larger currents.
Thermal considerations are paramount in LED application. Designing for heat dissipation can include thermal vias and pads, which help draw heat away from LEDs and into the substrate. Testing your layout using simulations before moving to manufacturing can also prevent costly errors.
| Design Consideration | Importance |
|---|---|
| Power Requirements | Crucial for ensuring functionality |
| Software Tools | Streamlines the design process |
| Layout Optimization | Minimizes signal loss and enhances manufacturability |
5. What Specifications Should You Consider?
When creating an LED light PCB, several specifications must be taken into account. What’s the real story? These specifications influence both the performance of the LED and the overall effectiveness of the lighting solution. First and foremost are voltage and current specifications. Each LED has a recommended operating voltage and current that must not be exceeded to avoid premature failure.
Size and layout considerations are equally critical. The dimensions of your PCB will affect where it fits within a final product design, and how many LEDs can be mounted. If the PCB is too large, it may not fit in a compact design; if it’s too small, there may not be enough room for adequate heat dissipation.
Furthermore, considering thermal management strategies is vital. LEDs can generate significant heat, and if not properly managed, this can lead to thermal runaways—where heat causes the LED to draw even more power, thus generating more heat. Implementing heat sinks, thermal pads, and appropriate trace widths can all help mitigate this.
Lastly, do not forget about component ratings. Each component introduced onto the PCB must be rated to handle the required voltage and current, ensuring that it functions correctly without failure. All these factors combined lay the groundwork for a successful LED light PCB design.
| Specification | Importance |
|---|---|
| Voltage and Current | Essential for LED performance maintenance |
| Size | Influences design compatibility |
| Thermal Management | Mitigates risks associated with heat generation |
6. How to Create the Schematic for an LED Light PCB?
Creating a schematic for an LED light PCB is a foundational step in the design process. But here’s the kicker: the quality of your schematic directly impacts the overall functionality of the final product. Start by familiarizing yourself with the basics of electronic schematics, which visually represent the components and connections in a circuit.
Choosing the right software for schematic design is crucial here. Many PCB design tools come with built-in schematic editors that allow you to drag and drop components, making it easier to visualize and lay out your design. This is the time to consider how your selected components interact with each other, ensuring that all connections are logical and feasible.
Once your components are placed, you’ll need to connect them with lines that represent the traces on the PCB. Pay careful attention to how you connect the ground and power lines, as this will affect the efficiency and performance of your LEDs.
It’s essential to label components clearly and include values for resistors or capacitors, as this documentation will help during both manufacturing and troubleshooting phases. After finalizing your schematic, run the design rule checks (DRCs) provided by the software to identify any potential errors before moving on to PCB layout.
| Component | Role in the Schematic |
|---|---|
| Resistor | Limits current to LEDs |
| Capacitor | Stabilizes voltage fluctuations |
| LEDs | Primary light sources |
7. What is the PCB Fabrication Process?
The PCB fabrication process is complex and involves several steps. This is where it gets interesting: understanding this process will not only enable you to design better PCBs but also help you communicate effectively with manufacturers. The first stage is the preparation of the design files, typically in Gerber format, which accurately detail the PCB layout.
Once the files are ready, the manufacturer begins the fabrication by selecting the appropriate materials based on your design. The next step involves etching the copper layer. This process removes unwanted copper to create the necessary traces and pads that will connect components.
Drilling holes for component placement is the following phase. It’s essential to use precise drilling methods to ensure that the holes match the component sizes specified in your schematic. Depending on the design, surface mount technology (SMT) and through-hole technology (THT) may be employed during assembly.
After drilling, the boards undergo plating to enhance the copper conductivity and protect them from environmental factors. Ultimately, the last stage of fabrication involves applying the solder mask to protect the traces and silkscreen for labeling components.
The entire process requires careful attention to detail to guarantee that the finished PCB meets the design specifications without defects.
| Process Stage | Description |
|---|---|
| Design File Preparation | Creation of Gerber files for production |
| Copper Etching | Removal of unwanted copper for circuit design |
| Drilling | Accurate holes for component placement |
| Plating | Enhances conductivity and protection |
| Solder Mask Application | Protects traces and components |
8. How to Assemble an LED Light PCB?
Assembling an LED light PCB is a meticulous process requiring attention to detail and precision. Ready for the good part? The assembly begins once the fabricated PCB arrives at your facility. Before starting, gather the necessary tools and components, including soldering equipment and protective gear.
Secure the components in place, ensuring that each LED is aligned with the designated pads. If using SMT components, a pick-and-place machine can improve efficiency and accuracy. For THT components, consider manual insertion and using a wave soldering machine for better results.
Soldering techniques vary, but common practices for LED assembly include hand soldering and reflow soldering. Hand soldering is generally preferred for precision, especially when dealing with delicate components. Ensure that the solder joints are smooth and adequately filled, as poor solder connections can lead to malfunction.
After soldering, conduct a visual inspection of the assembly. This step is crucial to identify any soldering defects or misaligned components. Following inspection, you may want to perform a continuity test to confirm proper connections before powering the circuit.
This assembly stage sets the stage for further testing and validation of the LED light PCB, ensuring that every component works as intended within the circuit.
| Assembly Technique | Description |
|---|---|
| Hand Soldering | Precision method for delicate components |
| Reflow Soldering | Efficient for surface mount components |
| Wave Soldering | Common for through-hole technology |
9. What are the Testing Methods for LED PCBs?
Testing is a critical phase in ensuring that your LED PCBs function as intended. What’s the real story? Without rigorous testing, even the most meticulously designed and assembled PCBs can fail, leading to costly rework and dissatisfied customers. Begin by conducting visual inspections to spot any obvious defects.
Next, electrical testing methods come into play. One common practice is continuity testing, where you verify the connection paths on the PCB. This helps to identify any open circuits or poorly soldered joints. Another important test is functional testing, where the circuit is powered on to validate that each component operates under the expected load.
Thermal testing also plays a vital role, especially in LED applications where heat management is crucial. By measuring temperature in real-time, you can ensure that the PCB remains within safe operating limits. If temperatures exceed specifications, it may indicate inadequate thermal management design.
Finally, stress testing can identify how well the PCB performs under extreme conditions. Subjecting the board to high and low temperatures or humidity can help predict how it will behave over time in real-world applications.
| Testing Method | Purpose |
|---|---|
| Visual Inspection | Identifies obvious defects |
| Continuity Testing | Verifies connections and solder joints |
| Thermal Testing | Monitors temperature during operation |
| Stress Testing | Evaluates performance under extreme conditions |
10. How to Troubleshoot Your LED Light PCB?
When issues arise with your LED light PCB, troubleshooting is paramount. This is where it gets interesting: a systematic approach helps you quickly identify and resolve problems. Start by revisiting your schematic and PCB layout. Ensure that all connections are as intended, with no misalignments.
Visual inspections can reveal common issues such as solder joints that may need reworking or components that are improperly seated. If the visual inspection doesn’t reveal the problem, it’s time to conduct electrical testing. Measure the voltage at various points to pinpoint where the circuit may not be responding as intended.
Thermal issues can also play a role in LED performance. If components get unusually hot during operation, it might indicate inadequate heat dissipation. Evaluate whether your thermal management strategies are sufficient—consider adding heat sinks or optimizing component placement.
If all else fails, consider seeking help from professionals or reaching out to the manufacturer who produced the components. They may have additional insights or resources that could assist in troubleshooting.
| Troubleshooting Step | Purpose |
|---|---|
| Revisit Schematic | Ensures connections match the intended design |
| Visual Inspection | Identifies soldering and placement issues |
| Electrical Testing | Locates non-functioning circuit areas |
| Seek Professional Help | Gains additional insight from experienced sources |
11. What are the Applications of LED PCBs?
LED PCBs serve a wide array of applications across various industries. But here’s the kicker: their versatility and efficiency make them indispensable in modern technology. Common uses include residential and commercial lighting, automotive applications, and electronic devices like televisions and smartphones.
In residential and commercial lighting, LED PCBs are favored for their energy efficiency and long lifespan. They come in various forms, such as recessed lights, bulbs, and strip lights, allowing for creative design solutions with reduced energy costs. In automotive applications, they enhance visibility and aesthetics, often found in headlights, tail lights, and interior lighting systems.
Beyond traditional lighting applications, LED PCBs are increasingly used in consumer electronics. From laptop keyboards illuminated with RGB lighting to notification lights in devices, their integral role enhances both functionality and user experience.
Emerging technology trends also see LED PCBs making strides in areas like horticulture lighting, where specific spectrums of light facilitate plant growth. Moreover, smart technology integration, where lighting systems adjust based on user patterns or environmental conditions, showcases the potential future applications of LED PCBs.
| Application Area | Uses |
|---|---|
| Residential Lighting | Indoor and exterior lighting solutions |
| Automotive | Headlights, tail lights, dashboards |
| Consumer Electronics | Keyboards, displays, and notification lights |
12. How to Maintain Your LED Light PCB?
Maintaining your LED light PCB is essential for ensuring longevity and performance. What’s the real story? Regular maintenance practices can help prevent unexpected failures and extend the life of your lighting systems. Begin with routine inspections, focusing on both the physical condition of the PCB and the functionality of the LED components.
Cleaning is another crucial aspect. Dust and grime can accumulate in recessed lighting fixtures, which can impede performance. Use a damp cloth to wipe down surfaces, being careful not to disturb the solder joints or connections. It’s best to schedule cleanings based on usage frequency to ensure lights operate at optimal efficiency.
Temperature monitoring can also play a key role in maintenance. If your LEDs frequently operate at high temperatures, consider evaluating the design for thermal management improvements. Using thermal cameras or thermocouples can help diagnose any thermal issues that may arise.
Lastly, record keeping is vital for maintenance. Document replacement schedules for components, cleaning activities, and any repairs. This approach creates a historical record that can inform future decisions and improve the reliability of your LED PCBs.
| Maintenance Task | Importance |
|---|---|
| Routine Inspections | Identifies physical issues and wear |
| Cleaning Protocols | Preserves LED efficiency and performance |
| Temperature Monitoring | Ensures safe operating conditions |
13. What are the Cost Considerations?
When designing and manufacturing LED light PCBs, understanding cost considerations is key. Ready for the good part? Various factors influence production costs, and recognizing these can help you budget effectively. Material costs represent one of the most significant expenses. High-quality substrates and components can drive up initial costs, but they often deliver better performance and longevity, which can reduce total lifetime costs.
Additionally, the complexity of the design directly impacts production costs. More intricate designs require advanced manufacturing techniques that may raise expenses. Consider using standard sizes and layouts when possible to leverage economies of scale.
Assembly costs also play a role. Whether you choose manual assembly or automated methods can influence labor costs significantly. Using automated assembly processes can reduce errors and labor time but may require a higher upfront investment in equipment.
Don’t overlook testing costs either. Comprehensive testing is essential to ensure product reliability, and depending on the methods used, it can contribute significantly to overall expenditure. Overall, understanding these cost components enables better financial planning and informed decisions throughout the design and production processes.
| Cost Factor | Impact |
|---|---|
| Material Costs | Influences initial investment and performance |
| Design Complexity | Affects manufacturing techniques and costs |
| Assembly Method | Determines labor costs and efficiency |
14. How to Stay Updated on LED PCB Technology?
Staying updated with the latest trends in LED PCB technology is essential for industry professionals. What’s the real story behind this? The rapid evolution of technology means that new materials, techniques, and applications are continually emerging. Following relevant publications, industry blogs, and journals can provide insights into recent advancements and best practices.
Attending industry conferences and workshops is another impactful way to network and learn about the latest developments. Events often feature expert speakers, hands-on demonstrations, and opportunities for collaboration. Engaging with peers can also stimulate discussions that lead to innovative solutions and ideas.
Moreover, joining professional organizations or online communities dedicated to PCB design and manufacturing can keep you informed. These platforms often facilitate knowledge sharing, problem-solving, and professional growth opportunities.
Keeping up-to-date with regulatory standards is also crucial. As environmental concerns grow, manufacturers are increasingly adopting eco-friendly practices. Staying informed about industry regulations ensures compliance and helps enhance sustainability efforts in your projects.
| Information Source | Description |
|---|---|
| Publications | Journals and blogs dedicated to PCB technology |
| Conferences | Networking and learning opportunities |
| Professional Organizations | Communities for sharing best practices and knowledge |
15. What Future Trends Can We Expect in LED Light PCB Development?
The future of LED light PCBs is filled with fascinating trends and innovations. But here’s the kicker: understanding these trends can enable businesses to adapt and thrive. One significant direction is the move toward more efficient materials that enhance thermal management and reduce environmental impact. Innovations in materials science could lead to developments that not only improve performance but also reduce production costs.
Another focus area is the integration of smart technologies. As the Internet of Things (IoT) expands, LED lights with embedded sensors and connectivity will become commonplace, allowing for enhanced control and energy savings. This integration promises to redefine how we perceive and utilize lighting in both residential and commercial spaces.
Emerging applications in niche markets, such as horticultural lighting or human-centric lighting, are also gaining traction. These trends highlight a shift towards specialized solutions that cater to specific lighting needs or environmental conditions. This could mean that your LED light PCB must increasingly adapt to diverse functionalities beyond traditional lighting.
Lastly, sustainability continues to play an ever-growing role in development. The move towards eco-friendly production practices, recyclable materials, and energy-efficient designs will only accelerate in importance as both consumers and businesses prioritize environmental responsibility.
| Future Trend | Description |
|---|---|
| Efficient Materials | Innovations to enhance performance and reduce cost |
| Smart Technology Integration | IoT-enabled lighting solutions |
| Niche Applications | Specialized lighting for unique conditions |
Conclusion
Creating an LED light PCB is an intricate and rewarding process that requires careful planning, execution, and ongoing maintenance. This article explored various facets, including design, specifications, assembly, and future trends, providing a comprehensive perspective on LED PCBs. As this technology continues to evolve, staying informed and adaptable will be key to leveraging its full potential.
FAQ Section
Q1: What is an LED Light PCB?
An LED Light PCB is a printed circuit board specifically designed to house and connect LED components in electronic devices, enabling efficient light production and functionality.
Q2: How does the fabrication of an LED Light PCB work?
The fabrication process involves designing the layout, etching the circuit, and assembling components to create a functional board that can drive LED lights.
Q3: What are the common problems with LED Light PCBs?
Common issues include short circuits, poor solder connections, thermal overload, and insufficient current handling, all of which can affect LED performance.
Q4: How can you troubleshoot an issue with your LED Light PCB?
Troubleshooting involves inspecting connections, testing voltage and current levels, and using diagnostic tools to identify faulty components.
Q5: What future trends can we expect for LED PCBs?
Trends include advancements in materials and technology, increased energy efficiency focus, and integration of smart technologies in LED PCB design.